(→Adding a Reference to the CKEditor.NET Control: /release -> /Release) |
(CKEditor.NET -> CKEditor for ASP.NET) |
||
| Line 1: | Line 1: | ||
__TOC__ | __TOC__ | ||
| − | {{#CUSTOMTITLE:Absolute Beginner's CKEditor.NET Control Integration Guide}} | + | {{#CUSTOMTITLE:Absolute Beginner's CKEditor for ASP.NET Control Integration Guide}} |
| − | These integration instructions are written with '''absolute beginners''' in mind and describe all steps required to run the CKEditor.NET control in details, with screenshots illustrating the whole process. | + | These integration instructions are written with '''absolute beginners''' in mind and describe all steps required to run the CKEditor for ASP.NET control in details, with screenshots illustrating the whole process. |
| − | If you want to integrate CKEditor with your ASP.NET page, go to the official [http://ckeditor.com/download CKEditor download site] and download the latest versions of both '''CKEditor 3.x''' and the '''CKEditor.NET control'''. | + | If you want to integrate CKEditor with your ASP.NET page, go to the official [http://ckeditor.com/download CKEditor download site] and download the latest versions of both '''CKEditor 3.x''' and the '''CKEditor for ASP.NET control'''. |
| − | Unpack both installation packages to a desired location and start Visual Studio. Please note that this document is based on Visual Studio 2010 and Visual C# language, but the steps required to run the CKEditor.NET control do not differ much in other versions of Visual Studio and for the Visual Basic programming language. | + | Unpack both installation packages to a desired location and start Visual Studio. Please note that this document is based on Visual Studio 2010 and Visual C# language, but the steps required to run the CKEditor for ASP.NET control do not differ much in other versions of Visual Studio and for the Visual Basic programming language. |
== Creating a New ASP.NET Website == | == Creating a New ASP.NET Website == | ||
| Line 29: | Line 29: | ||
| − | == Adding a Reference to the CKEditor.NET Control == | + | == Adding a Reference to the CKEditor for ASP.NET Control == |
| − | The default empty website is now ready. It is time to add a reference to the CKEditor.NET control. Open the context menu of the solution and select '''Add Reference'''. | + | The default empty website is now ready. It is time to add a reference to the CKEditor for ASP.NET control. Open the context menu of the solution and select '''Add Reference'''. |
[[Image:CKENET_VS_new_reference.png|thumbnail|center|800px|Adding a reference in Visual Studio 2010]] | [[Image:CKENET_VS_new_reference.png|thumbnail|center|800px|Adding a reference in Visual Studio 2010]] | ||
| − | Go to the '''Browse''' tab and browse to the location where you previously unpacked the CKEditor.NET control files. Go to the <code>bin\Release\</code> folder, choose the <code>CKEditor.NET.dll</code> file and click '''OK'''. | + | Go to the '''Browse''' tab and browse to the location where you previously unpacked the CKEditor for ASP.NET control files. Go to the <code>bin\Release\</code> folder, choose the <code>CKEditor.NET.dll</code> file and click '''OK'''. |
| − | [[Image:CKENET_VS_control_reference.png|thumbnail|center|450px|Adding the CKEditor.NET reference in Visual Studio 2010]] | + | [[Image:CKENET_VS_control_reference.png|thumbnail|center|450px|Adding the CKEditor for ASP.NET reference in Visual Studio 2010]] |
| − | The CKEditor.NET control is now referenced in the ASP.NET website, as can be seen in the figure below. | + | The CKEditor for ASP.NET control is now referenced in the ASP.NET website, as can be seen in the figure below. |
| − | [[Image:CKENET_VS_control_referenced.png|thumbnail|center|170px|CKEditor.NET control referenced in Visual Studio 2010]] | + | [[Image:CKENET_VS_control_referenced.png|thumbnail|center|170px|CKEditor for ASP.NET control referenced in Visual Studio 2010]] |
== Adding CKEditor Files == | == Adding CKEditor Files == | ||
| − | Now you need to add CKEditor files to the solution. Copy the unpacked editor files from the installation package and paste them into the application directory. The solution tree with the CKEditor.NET control reference and CKEditor files should look like in the figure below. | + | Now you need to add CKEditor files to the solution. Copy the unpacked editor files from the installation package and paste them into the application directory. The solution tree with the CKEditor for ASP.NET control reference and CKEditor files should look like in the figure below. |
[[Image:CKENET_VS_ckeditor_added.png|thumbnail|center|180px|CKEditor files added in Visual Studio 2010]] | [[Image:CKENET_VS_ckeditor_added.png|thumbnail|center|180px|CKEditor files added in Visual Studio 2010]] | ||
| Line 51: | Line 51: | ||
== Adding CKEditor to the Page == | == Adding CKEditor to the Page == | ||
| − | All resources are now available. It is time to open the <code>Default.aspx</code> file and register the CKEditor.NET control. In '''Source''' mode add the following call under the <code><%@ Page %></code> section: | + | All resources are now available. It is time to open the <code>Default.aspx</code> file and register the CKEditor for ASP.NET control. In '''Source''' mode add the following call under the <code><%@ Page %></code> section: |
<source> | <source> | ||
| Line 57: | Line 57: | ||
</source> | </source> | ||
| − | This will register the CKEditor.NET control on the page. Now insert the editor instance into the page body using the following call: | + | This will register the CKEditor for ASP.NET control on the page. Now insert the editor instance into the page body using the following call: |
<source> | <source> | ||
Latest revision as of 14:41, 20 April 2011
Contents
These integration instructions are written with absolute beginners in mind and describe all steps required to run the CKEditor for ASP.NET control in details, with screenshots illustrating the whole process.
If you want to integrate CKEditor with your ASP.NET page, go to the official CKEditor download site and download the latest versions of both CKEditor 3.x and the CKEditor for ASP.NET control.
Unpack both installation packages to a desired location and start Visual Studio. Please note that this document is based on Visual Studio 2010 and Visual C# language, but the steps required to run the CKEditor for ASP.NET control do not differ much in other versions of Visual Studio and for the Visual Basic programming language.
Creating a New ASP.NET Website
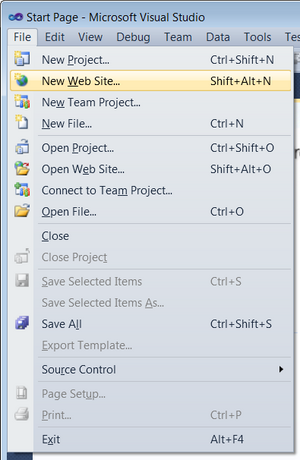
Select the New Web Site command from the File menu (or use the Shift+Alt+N keyboard shortcut).
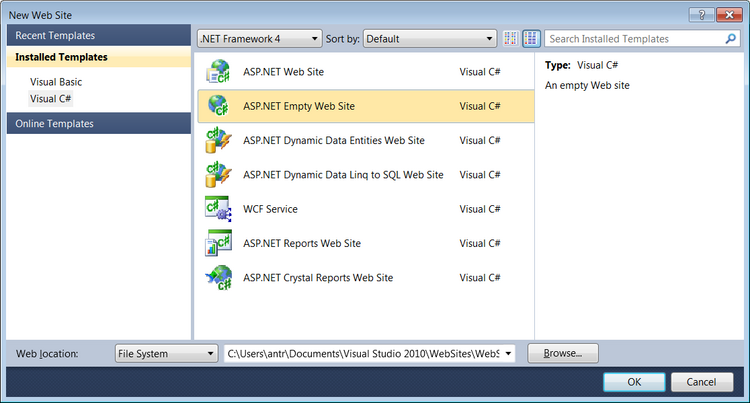
Choose ASP.NET Empty Web Site from installed templates for the programming language of your choice, and click OK.
Adding a New Web Form
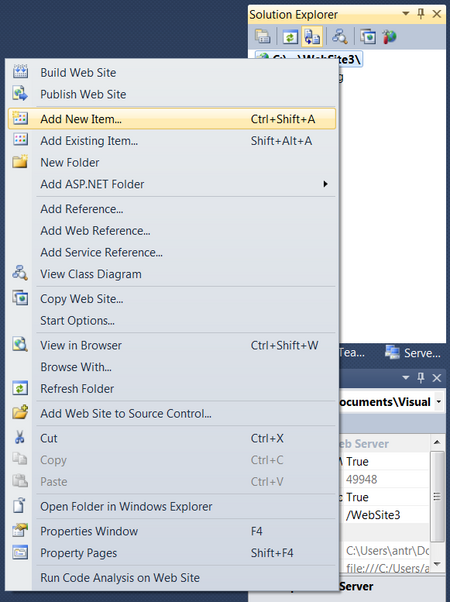
Since the website is really empty, you now need to add some default contents to it. Open the context menu of the solution and select Add New Item (or use the Ctrl+Shift+A keyboard shortcut).
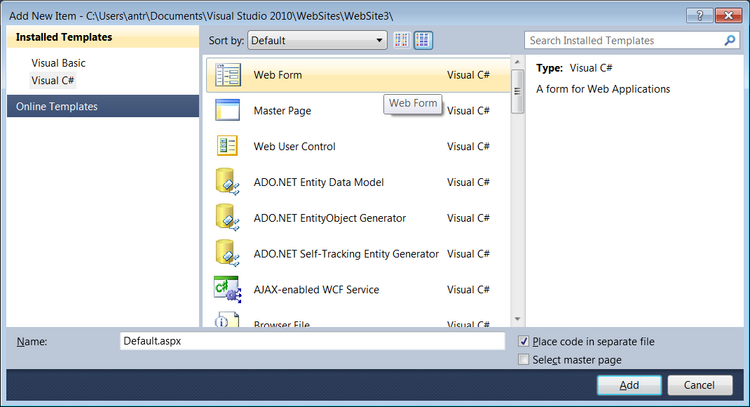
Now choose the Web Form template for the programming language of your choice, name the page (Default.aspx in our case), and click Add.
Adding a Reference to the CKEditor for ASP.NET Control
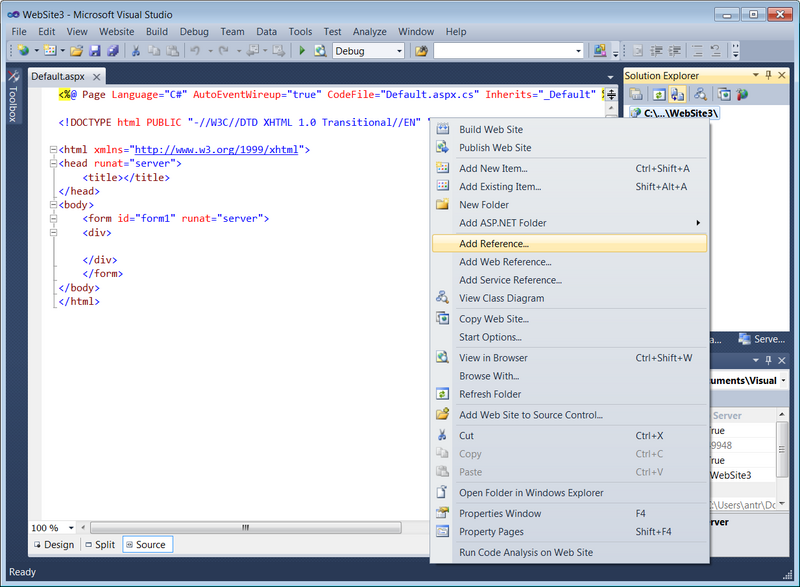
The default empty website is now ready. It is time to add a reference to the CKEditor for ASP.NET control. Open the context menu of the solution and select Add Reference.
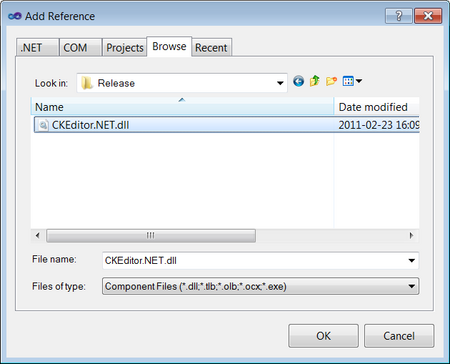
Go to the Browse tab and browse to the location where you previously unpacked the CKEditor for ASP.NET control files. Go to the bin\Release\ folder, choose the CKEditor.NET.dll file and click OK.
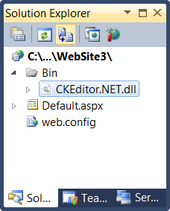
The CKEditor for ASP.NET control is now referenced in the ASP.NET website, as can be seen in the figure below.
Adding CKEditor Files
Now you need to add CKEditor files to the solution. Copy the unpacked editor files from the installation package and paste them into the application directory. The solution tree with the CKEditor for ASP.NET control reference and CKEditor files should look like in the figure below.
Adding CKEditor to the Page
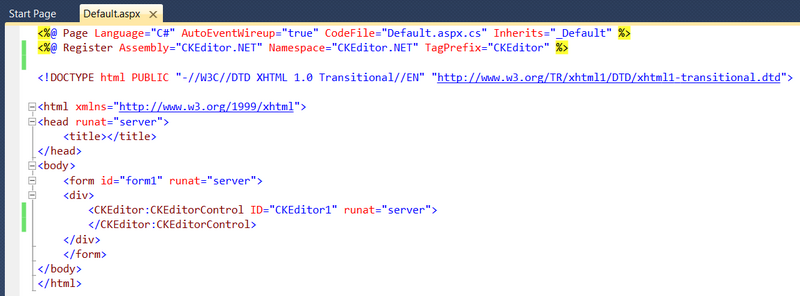
All resources are now available. It is time to open the Default.aspx file and register the CKEditor for ASP.NET control. In Source mode add the following call under the <%@ Page %> section:
<%@ Register Assembly="CKEditor.NET" Namespace="CKEditor.NET" TagPrefix="CKEditor" %>
This will register the CKEditor for ASP.NET control on the page. Now insert the editor instance into the page body using the following call:
<CKEditor:CKEditorControl ID="CKEditor1" runat="server">
</CKEditor:CKEditorControl>
The page source will look like this:
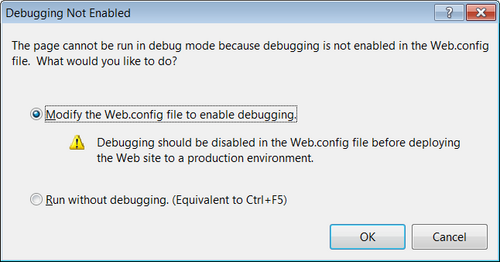
The page is now ready — it is time to run it. Use the Start Debugging command or the F5 keyboard shortcut to open it. When running for the first time, Visual Studio will prompt you to enable debugging for the project.
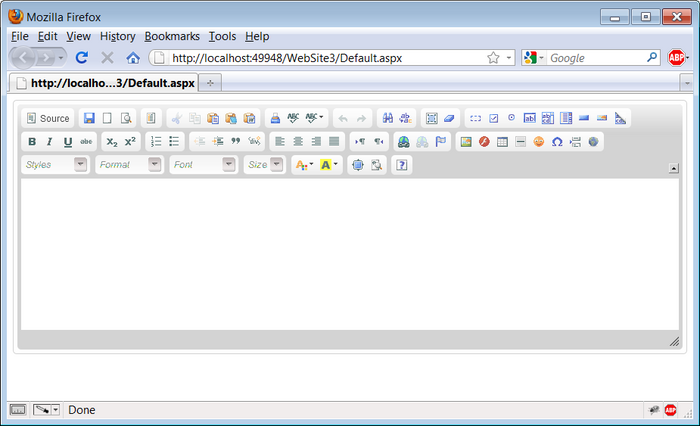
After you click OK, the ASP.NET site will be open in your default browser.
The CKEditor instance was successfully added to the page and is ready to be used.
