(Article contents added) |
(added info about BasePath) |
||
| (One intermediate revision by one other user not shown) | |||
| Line 1: | Line 1: | ||
| − | {{#CUSTOMTITLE:CKEditor.NET Control Integration Guide}} | + | {{#CUSTOMTITLE:CKEditor for ASP.NET Control Integration Guide}} |
| − | These integration instructions are written with '''more advanced ASP.NET developers''' in mind and describe the basic steps required to run the CKEditor.NET control. If you are not sure about the whole process, please refer to the [[CKEditor_3.x/Developers_Guide/ASP.NET/Integration_Beginners|Absolute Beginner's CKEditor.NET Control Integration Guide]] with a detailed description of the process along with some screenshots. | + | These integration instructions are written with '''more advanced ASP.NET developers''' in mind and describe the basic steps required to run the CKEditor for ASP.NET control. If you are not sure about the whole process, please refer to the [[CKEditor_3.x/Developers_Guide/ASP.NET/Integration_Beginners|Absolute Beginner's CKEditor for ASP.NET Control Integration Guide]] with a detailed description of the process along with some screenshots. |
If you want to integrate CKEditor with your ASP.NET page, follow the steps outlined below. | If you want to integrate CKEditor with your ASP.NET page, follow the steps outlined below. | ||
| − | # Go to the official [http://ckeditor.com/download CKEditor download site] and download the latest versions of both '''CKEditor 3.x''' and the '''CKEditor.NET control'''. | + | # Go to the official [http://ckeditor.com/download CKEditor download site] and download the latest versions of both '''CKEditor 3.x''' and the '''CKEditor for ASP.NET control'''. |
# Unpack both installation packages to a desired location. | # Unpack both installation packages to a desired location. | ||
| − | # Add a reference to the CKEditor.NET Control to your website. | + | # Add a reference to the CKEditor for ASP.NET Control to your website. |
| − | #: In Visual Studio use the '''Add Reference''' command and browse to <code>bin\Release\CKEditor.NET.dll</code> file from the unpacked CKEditor.NET installation package. You can also manually copy the DLL file to the <code>bin</code> folder of your application. | + | #: In Visual Studio use the '''Add Reference''' command and browse to <code>bin\Release\CKEditor.NET.dll</code> file from the unpacked CKEditor for ASP.NET installation package. You can also manually copy the DLL file to the <code>bin</code> folder of your application. |
# Copy the unpacked editor files from the CKEditor 3.x installation package and paste them into the application directory of your website. | # Copy the unpacked editor files from the CKEditor 3.x installation package and paste them into the application directory of your website. | ||
| − | # Register the CKEditor.NET control in your page: | + | # Register the CKEditor for ASP.NET control in your page: |
#: <source> | #: <source> | ||
<%@ Register Assembly="CKEditor.NET" Namespace="CKEditor.NET" TagPrefix="CKEditor" %> | <%@ Register Assembly="CKEditor.NET" Namespace="CKEditor.NET" TagPrefix="CKEditor" %> | ||
| Line 14: | Line 14: | ||
# Insert a CKEditor instance into the page body: | # Insert a CKEditor instance into the page body: | ||
#: <source> | #: <source> | ||
| − | <CKEditor:CKEditorControl ID="CKEditor1" runat="server"></CKEditor:CKEditorControl> | + | <CKEditor:CKEditorControl ID="CKEditor1" BasePath="/ckeditor/" runat="server"></CKEditor:CKEditorControl> |
</source> | </source> | ||
| + | #: (where <code>BasePath</code> points to the directory with CKEditor) | ||
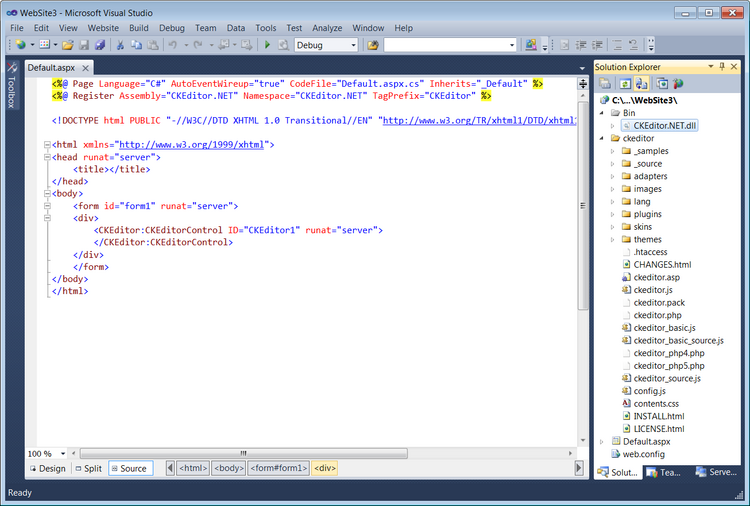
A sample page of your project containing CKEditor might look like the one below. When you run the application in the browser, you will be able to use all features of the editor. | A sample page of your project containing CKEditor might look like the one below. When you run the application in the browser, you will be able to use all features of the editor. | ||
[[Image:CKENET_VS_project.png|thumbnail|center|750px|Sample Visual Studio project containing CKEditor]] | [[Image:CKENET_VS_project.png|thumbnail|center|750px|Sample Visual Studio project containing CKEditor]] | ||
Latest revision as of 17:02, 21 June 2012
These integration instructions are written with more advanced ASP.NET developers in mind and describe the basic steps required to run the CKEditor for ASP.NET control. If you are not sure about the whole process, please refer to the Absolute Beginner's CKEditor for ASP.NET Control Integration Guide with a detailed description of the process along with some screenshots.
If you want to integrate CKEditor with your ASP.NET page, follow the steps outlined below.
- Go to the official CKEditor download site and download the latest versions of both CKEditor 3.x and the CKEditor for ASP.NET control.
- Unpack both installation packages to a desired location.
- Add a reference to the CKEditor for ASP.NET Control to your website.
- In Visual Studio use the Add Reference command and browse to
bin\Release\CKEditor.NET.dllfile from the unpacked CKEditor for ASP.NET installation package. You can also manually copy the DLL file to thebinfolder of your application.
- In Visual Studio use the Add Reference command and browse to
- Copy the unpacked editor files from the CKEditor 3.x installation package and paste them into the application directory of your website.
- Register the CKEditor for ASP.NET control in your page:
-
<%@ Register Assembly="CKEditor.NET" Namespace="CKEditor.NET" TagPrefix="CKEditor" %>
-
- Insert a CKEditor instance into the page body:
-
<CKEditor:CKEditorControl ID="CKEditor1" BasePath="/ckeditor/" runat="server"></CKEditor:CKEditorControl>
- (where
BasePathpoints to the directory with CKEditor)
-
A sample page of your project containing CKEditor might look like the one below. When you run the application in the browser, you will be able to use all features of the editor.
