(Path modified) |
(license variable added) |
||
| Line 1: | Line 1: | ||
{{#CUSTOMTITLE:CKEditor for Drupal 7 Plugins (Enterprise Version)}} | {{#CUSTOMTITLE:CKEditor for Drupal 7 Plugins (Enterprise Version)}} | ||
| − | {{Drupal Plugins|path=Configuration''' > '''Content Authoring|version=7}} | + | {{Drupal Plugins|path=Configuration''' > '''Content Authoring|version=7|license=Enterprise}} |
Latest revision as of 13:39, 31 May 2012
Contents
CKEditor is known for its flexibility and extensibility. New functionality can be added at no cost by using dedicated plugins. Some additional plugins are already included in the module files and can be simply enabled in the Drupal administration panel; others can be installed separately as described below. You can even create your own plugins to further adjust CKEditor for your specific needs.
Adding a Plugin
If you want to add a new CKEditor plugin, download the plugin package that you wish to install and unpack it to the sites\all\modules\ckeditor\plugins directory.
The plugin folder should contain at least the plugin.js file that is responsible for the plugin logic.
sites\all\modules\ckeditor\plugins directory is the default one. You can also change it in the CKEditor Global Profile by adjusting the Path to the CKEditor plugins directory option.
When the plugin is unpacked correctly, it will automatically appear on the plugins list in your CKEditor profiles along with its toolbar buttons.
Enabling a Plugin
If you want to manage CKEditor plugins for a profile, go to the Administration panel > Configuration > Content Authoring > CKEditor section. This section lets you choose the plugins relevant for each CKEditor profile from a list. Choose a profile that you want to use and expand the Editor appearance section of the configuration panel.
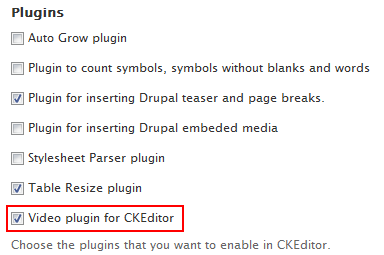
Find the plugin in the Plugins section. In order to activate it, select the checkbox next to its name.
If a plugin contains toolbar buttons, they will be automatically added to the All buttons toolbar panel. If this is the case, you can add the button to the CKEditor toolbar for a given profile by dragging it to the Used buttons toolbar panel and dropping in the place where you want it to appear.
Alternatively, if you turned off the toolbar wizard and prefer to enter the toolbar configuration manually, you will need to add the plugin button by yourself by appending it to your toolbar definition code.
Please note that some plugins require installing additional modules to work correctly.
Integrating a Plugin with the CKEditor Module (for Plugin Developers)
Integrating your application with the CKEditor module by adding a plugin works through a special hook. An example of the hook is shown below:
function MODULENAME_ckeditor_plugin() {
   return array(
      'plugin_name' => array(
         // Plugin name.
            'name' => 'plugin_name',
            // Plugin description - it will be displayed in the plugins management section of the profile settings.
            'desc' => t('Plugin description'),
            // The full path to the CKEditor plugin directory, trailing slash included.
            'path' => drupal_get_path('module', 'my_module') . '/plugin_dir/',
            // Plugin buttons definition (optional).
            'buttons' => array(
               'button_name' => array('label' => 'Button label', 'icon' => '/path/to/icon/image'),
               'button_name' => array('label' => 'Button label', 'icon' => '/path/to/icon/image'),
               ...
            )
         )
      )
   );
}
Please note that MODULENAME in the code above is the name of the module.
After the hook is used the plugin will automatically appear on the plugin list for each CKEditor profile where you will be able to enable it as described in the Enabling a Plugin section above.

