(→Properties) |
Sebstefanov (talk | contribs) m |
||
| (24 intermediate revisions by 2 users not shown) | |||
| Line 1: | Line 1: | ||
| − | Inserting Flash | + | {{#CUSTOMTITLE:Inserting Flash}} |
| + | __TOC__ | ||
| + | CKEditor allows you to add [http://www.adobe.com/flashplatform/ Adobe Flash] files to your documents in an easy and intuitive way. | ||
| − | + | In order to insert a Flash object, press the [[Image:CKEditor_flash.png|Flash]] button on the toolbar. The '''Flash Properties''' dialog window that will open lets you set configuration options that define the Flash object source, its size, display properties, or other advanced properties. | |
| − | [[ | + | The '''Flash Properties''' dialog window includes four tabs that group Flash object options: |
| + | * [[CKEditor_3.x/Users_Guide/Rich Text/Flash#General|General]] | ||
| + | * [[CKEditor_3.x/Users_Guide/Rich Text/Flash#Upload|Upload]] | ||
| + | * [[CKEditor_3.x/Users_Guide/Rich Text/Flash#Properties|Properties]] | ||
| + | * [[CKEditor_3.x/Users_Guide/Rich Text/Flash#Advanced|Advanced]] | ||
| − | + | {{CKEditor Dialog Windows}} | |
| − | + | == General == | |
| − | + | The '''General''' tab is the default tab that opens after you press the [[Image:CKEditor_flash.png|Flash]] button on the toolbar. It allows you to set the URL of the Flash object and configure the way it will appear in the document. | |
| − | |||
| − | |||
| − | |||
| − | |||
| + | [[Image:CKEditor_flash_general.png|frame|center|General tab of the Flash Properties window]] | ||
| − | |||
| − | + | Below is an overview of all '''General''' tab elements: | |
| + | * '''URL''' – the web address of the Flash object. The object may be located on the same server as the web site you are currently in or on an external server. | ||
| + | ** External server: If you want to use an external address, use the full absolute path. | ||
| + | **: Example: | ||
| + | **: <code><nowiki>http://example.com/flash1.swf</nowiki></code> | ||
| + | ** Local server: If the image is located on the same server, you can use a relative path that omits the domain name and starts with a slash. | ||
| + | **: Example: | ||
| + | **: <code><nowiki>/animation/flash2.swf</nowiki></code> | ||
| + | **: If CKEditor is integrated with a file browser (like [http://ckfinder.com/ CKFinder]), you can also use the '''Browse Server''' button to select a Flash object from the ones that are available on the server. | ||
| − | + | * '''Width''' – the width of the Flash object in pixels. | |
| + | * '''Height''' – the height of the Flash object in pixels. | ||
| − | + | * '''HSpace''' – the horizontal spacing (or margin) between the Flash object and other document elements that surround it, in pixels. | |
| + | * '''VSpace''' – the vertical spacing (or margin) between the Flash object and other document elements that surround it, in pixels. | ||
| − | * ''' | + | * '''Preview''' – a preliminary view of the selected Flash object formatted according to the options chosen above. |
| − | + | == Upload == | |
| + | The '''Upload''' tab of the '''Flash Properties''' dialog window allows you to send your own Flash objects to the server. It is only visible if the server accepts files uploaded by the users and CKEditor is integrated with a file browser (like [http://ckfinder.com/ CKFinder]). | ||
| − | + | [[Image:CKEditor_flash_upload.png|frame|center|Upload tab of the Flash Properties window]] | |
| − | |||
| − | + | To upload a Flash file, click the file input field or the '''Browse''' button next to it. When the file browser of your operating system opens, navigate to an appropriate folder and choose a file by double clicking it or using the '''Open''' button. To send the file to the server, click the '''Send it to the Server''' button of CKEditor. | |
| − | + | == Properties == | |
| + | The '''Properties''' tab lets you configure various Flash options that control the behavior of the inserted object. They also provide access to Adobe Flash Player settings that enable the object to play automatically or loop. | ||
| − | + | [[Image:CKEditor_flash_properties.png|frame|center|Properties tab of the Flash Properties window]] | |
| − | |||
| − | |||
| − | |||
| − | |||
| − | |||
| − | |||
| − | |||
| − | |||
| − | |||
| + | Below is an overview of all '''Properties''' tab elements: | ||
| + | * '''Scale''' – the parameter that controls the scaling, stretching, or shrinking of the Flash object when the browser window is resized (<code>scale</code> attribute). You can choose between the following options: | ||
| + | ** '''Show all''' – the entire object is visible with original aspect ratio retained. Borders may be present. | ||
| + | ** '''No Border''' – the object is scaled to fit within the specified area without any borders, with original aspect ratio retained (the sides of the object may be cropped). | ||
| + | ** '''Exact Fit''' – the entire object is visible within the specified area, but the original aspect ratio might not be retained thus making the object distorted. | ||
| + | * '''Script Access''' – the parameter that controls the ability of the Flash object to communicate with the page it is embedded in (<code>allowScriptAccess</code> attribute). You can choose between the following options: | ||
| + | ** '''Always''' – the Flash object can communicate with the HTML page it is embedded in even if they are from different domains. | ||
| + | ** '''Same domain''' – the Flash object can communicate with the HTML page it is embedded in only if they are from the same domain. | ||
| + | ** '''Never''' – the Flash object cannot communicate with the HTML page it is embedded in. | ||
| + | * '''Window mode''' – the parameter that controls the layering of the Flash object in the browser window (<code>wmode</code> attribute). You can choose between the following options: | ||
| + | ** '''Window''' – the Flash object is shown in its own window on a document. | ||
| + | ** '''Opaque''' – the Flash object hides everything underneath. | ||
| + | ** '''Transparent''' – the document background shows through all transparent parts of the Flash object. | ||
| + | * '''Quality''' – the parameter that controls the relation between the speed of the object and its appearance (<code>quality</code> attribute). You can choose between the following options: | ||
| + | ** '''Best''' – best appearance, speed is disregarded. | ||
| + | ** '''High''' – appearance is favored over speed. | ||
| + | ** '''Auto Hig'''h – speed and appearance are equally emphasized. | ||
| + | ** '''Medium''' – speed is favored over quality, but some anti-aliasing is applied. | ||
| + | ** '''Auto Low''' – speed is favored over quality, but quality is improved whenever possible. | ||
| + | ** '''Low''' – speed is favored over quality and anti-aliasing is never applied. | ||
| + | * '''Align''' – the parameter that controls the alignment of the Flash object in the document (<code>align</code> attribute). You can choose between the following options: '''Left''', '''Abs Bottom''', '''Abs Middle''', '''Baseline''', '''Bottom''', '''Middle''', '''Right''', '''Text Top''', or '''Top'''. | ||
| − | |||
| − | + | The '''Properties''' tab lets you configure four additional options pertaining to the Flash Player: | |
| + | * '''Enable Flash Menu''' – the parameter that controls whether the Flash context menu is enabled. | ||
| + | * '''Auto Play''' – the parameter that controls whether the Flash object will start playing automatically right after you open the document. | ||
| + | * '''Loop''' – the parameter that controls whether the Flash object will play continuously in a loop. | ||
| + | * '''Allow Fullscreen''' – the parameter that controls whether the Flash object may be played in the full screen mode. | ||
| − | + | == Advanced == | |
| + | The '''Advanced''' tab lets you configure additional Flash object options such as assign it an ID, a class, a tooltip, or CSS style properties. It is meant for advanced users with knowledge of HTML as well as CSS, and gives nearly endless possibilities as far as the presentation of the Flash object is concerned. | ||
| − | [[Image:CKEditor_flash_advanced.png]] | + | [[Image:CKEditor_flash_advanced.png|frame|center|Advanced tab of the Flash Properties window]] |
| − | * '''Id''' | + | |
| − | * '''Advisory Title''' | + | Below is the overview of all '''Advanced''' tab elements: |
| − | * '''Background color''' | + | |
| − | * '''Stylesheet Classes''' | + | * '''Id''' – a unique identifier for a Flash object element in the document (<code>id</code> attribute). |
| − | * '''Style''': | + | * '''Advisory Title''' – the text of the tooltip that is shown when the mouse cursor hovers over the Flash object (<code>title</code> attribute). |
| + | * '''Background color''' – the color that is visible beneath the transparent portions of the Flash object. | ||
| + | * '''Stylesheet Classes''' – the class of the Flash object element (<code>class</code> attribute). Note that a Flash object element might be assigned more than one class. If this is a case, separate class names with spaces. | ||
| + | * '''Style''' – CSS style definitions (<code>style</code> attribute). Note that each value must end with a semi-colon and individual properties should be separated with spaces. | ||
| + | |||
| + | == Flash Object Preview == | ||
| + | Please note that on inserting into the document, the Flash object will be displayed in the CKEditor editing area as a fake element. | ||
| + | |||
| + | [[Image:CKEditor_flash_example.png|frame|center|Flash object as seen in the editor window]] | ||
| + | |||
| + | |||
| + | If you want to see check its final appearance, press the [[Image:CKEditor_preview.png|Preview]] toolbar button to use the [[CKEditor_3.x/Users_Guide/Document/Preview|Preview]] feature of CKEditor. The figure below shows the same Flash object in the preview mode. | ||
| + | |||
| + | [[Image:CKEditor_flash_preview.png|frame|center|Flash object as seen in the preview window]] | ||
Latest revision as of 12:45, 8 August 2012
CKEditor allows you to add Adobe Flash files to your documents in an easy and intuitive way.
In order to insert a Flash object, press the ![]() button on the toolbar. The Flash Properties dialog window that will open lets you set configuration options that define the Flash object source, its size, display properties, or other advanced properties.
button on the toolbar. The Flash Properties dialog window that will open lets you set configuration options that define the Flash object source, its size, display properties, or other advanced properties.
The Flash Properties dialog window includes four tabs that group Flash object options:
For general information on using dialog windows please refer to the Dialog Windows section of the User's Guide.
General
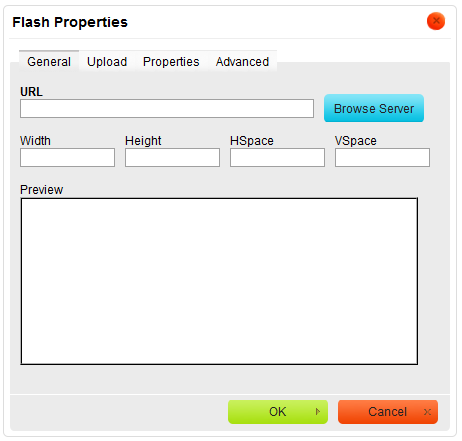
The General tab is the default tab that opens after you press the ![]() button on the toolbar. It allows you to set the URL of the Flash object and configure the way it will appear in the document.
button on the toolbar. It allows you to set the URL of the Flash object and configure the way it will appear in the document.
Below is an overview of all General tab elements:
- URL – the web address of the Flash object. The object may be located on the same server as the web site you are currently in or on an external server.
- External server: If you want to use an external address, use the full absolute path.
- Example:
-
http://example.com/flash1.swf
- Local server: If the image is located on the same server, you can use a relative path that omits the domain name and starts with a slash.
- Example:
-
/animation/flash2.swf - If CKEditor is integrated with a file browser (like CKFinder), you can also use the Browse Server button to select a Flash object from the ones that are available on the server.
- External server: If you want to use an external address, use the full absolute path.
- Width – the width of the Flash object in pixels.
- Height – the height of the Flash object in pixels.
- HSpace – the horizontal spacing (or margin) between the Flash object and other document elements that surround it, in pixels.
- VSpace – the vertical spacing (or margin) between the Flash object and other document elements that surround it, in pixels.
- Preview – a preliminary view of the selected Flash object formatted according to the options chosen above.
Upload
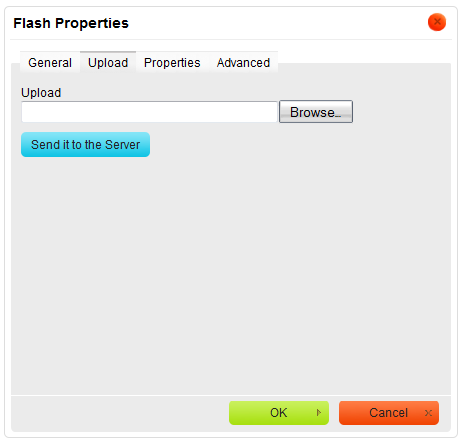
The Upload tab of the Flash Properties dialog window allows you to send your own Flash objects to the server. It is only visible if the server accepts files uploaded by the users and CKEditor is integrated with a file browser (like CKFinder).
To upload a Flash file, click the file input field or the Browse button next to it. When the file browser of your operating system opens, navigate to an appropriate folder and choose a file by double clicking it or using the Open button. To send the file to the server, click the Send it to the Server button of CKEditor.
Properties
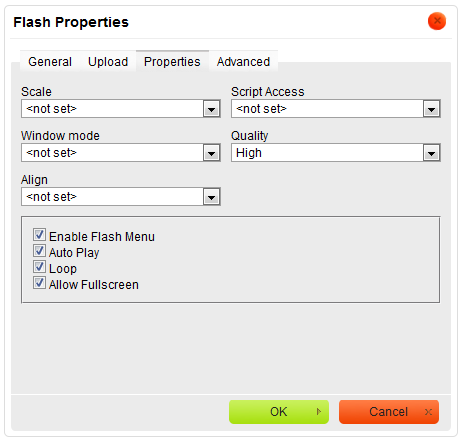
The Properties tab lets you configure various Flash options that control the behavior of the inserted object. They also provide access to Adobe Flash Player settings that enable the object to play automatically or loop.
Below is an overview of all Properties tab elements:
- Scale – the parameter that controls the scaling, stretching, or shrinking of the Flash object when the browser window is resized (
scaleattribute). You can choose between the following options:- Show all – the entire object is visible with original aspect ratio retained. Borders may be present.
- No Border – the object is scaled to fit within the specified area without any borders, with original aspect ratio retained (the sides of the object may be cropped).
- Exact Fit – the entire object is visible within the specified area, but the original aspect ratio might not be retained thus making the object distorted.
- Script Access – the parameter that controls the ability of the Flash object to communicate with the page it is embedded in (
allowScriptAccessattribute). You can choose between the following options:- Always – the Flash object can communicate with the HTML page it is embedded in even if they are from different domains.
- Same domain – the Flash object can communicate with the HTML page it is embedded in only if they are from the same domain.
- Never – the Flash object cannot communicate with the HTML page it is embedded in.
- Window mode – the parameter that controls the layering of the Flash object in the browser window (
wmodeattribute). You can choose between the following options:- Window – the Flash object is shown in its own window on a document.
- Opaque – the Flash object hides everything underneath.
- Transparent – the document background shows through all transparent parts of the Flash object.
- Quality – the parameter that controls the relation between the speed of the object and its appearance (
qualityattribute). You can choose between the following options:- Best – best appearance, speed is disregarded.
- High – appearance is favored over speed.
- Auto High – speed and appearance are equally emphasized.
- Medium – speed is favored over quality, but some anti-aliasing is applied.
- Auto Low – speed is favored over quality, but quality is improved whenever possible.
- Low – speed is favored over quality and anti-aliasing is never applied.
- Align – the parameter that controls the alignment of the Flash object in the document (
alignattribute). You can choose between the following options: Left, Abs Bottom, Abs Middle, Baseline, Bottom, Middle, Right, Text Top, or Top.
The Properties tab lets you configure four additional options pertaining to the Flash Player:
- Enable Flash Menu – the parameter that controls whether the Flash context menu is enabled.
- Auto Play – the parameter that controls whether the Flash object will start playing automatically right after you open the document.
- Loop – the parameter that controls whether the Flash object will play continuously in a loop.
- Allow Fullscreen – the parameter that controls whether the Flash object may be played in the full screen mode.
Advanced
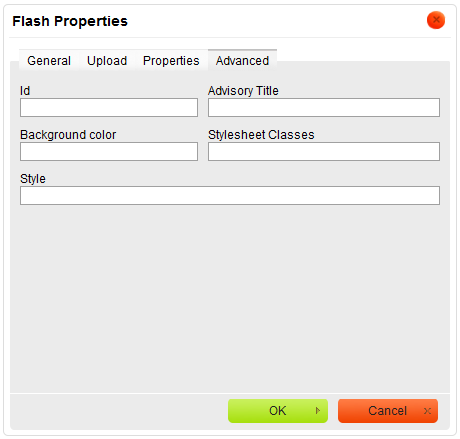
The Advanced tab lets you configure additional Flash object options such as assign it an ID, a class, a tooltip, or CSS style properties. It is meant for advanced users with knowledge of HTML as well as CSS, and gives nearly endless possibilities as far as the presentation of the Flash object is concerned.
Below is the overview of all Advanced tab elements:
- Id – a unique identifier for a Flash object element in the document (
idattribute). - Advisory Title – the text of the tooltip that is shown when the mouse cursor hovers over the Flash object (
titleattribute). - Background color – the color that is visible beneath the transparent portions of the Flash object.
- Stylesheet Classes – the class of the Flash object element (
classattribute). Note that a Flash object element might be assigned more than one class. If this is a case, separate class names with spaces. - Style – CSS style definitions (
styleattribute). Note that each value must end with a semi-colon and individual properties should be separated with spaces.
Flash Object Preview
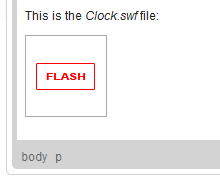
Please note that on inserting into the document, the Flash object will be displayed in the CKEditor editing area as a fake element.
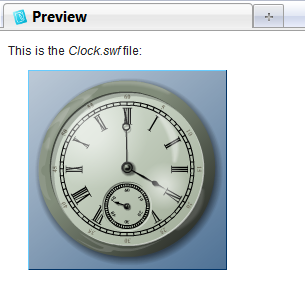
If you want to see check its final appearance, press the ![]() toolbar button to use the Preview feature of CKEditor. The figure below shows the same Flash object in the preview mode.
toolbar button to use the Preview feature of CKEditor. The figure below shows the same Flash object in the preview mode.
