(Upload tab rewritten.) |
(Advanced tab section rewritten.) |
||
| Line 100: | Line 100: | ||
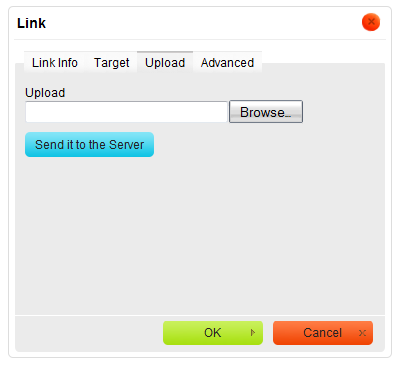
To upload a file, click the file input field or the '''Browse''' button next to it. When the file browser of your operating system opens, navigate to an appropriate folder and choose a file by double clicking it or using the '''Open''' button. To send the file to the server, click the '''Send it to the Server''' button of CKEditor. The '''Link Info''' tab will open and the URL of the uploaded file will automatically appear in the '''URL''' field. | To upload a file, click the file input field or the '''Browse''' button next to it. When the file browser of your operating system opens, navigate to an appropriate folder and choose a file by double clicking it or using the '''Open''' button. To send the file to the server, click the '''Send it to the Server''' button of CKEditor. The '''Link Info''' tab will open and the URL of the uploaded file will automatically appear in the '''URL''' field. | ||
| + | |||
| + | |||
| + | == Advanced == | ||
| + | The '''Advanced''' tab lets you configure additional link options such as assign it an ID, a class, a tab index, a tooltip, or CSS style properties. It is meant for advanced users with knowledge of HTML and CSS and gives nearly endless possibilities as far as the presentation of the link is concerned. | ||
| + | |||
| + | [[Image:CKEditor_link_advanced.png|frame|center|alt=Advanced tab of the Link window|Advanced tab of the Link window]] | ||
| + | |||
| + | |||
| + | Below is the overview of all '''Advanced''' tab elements: | ||
| + | |||
| + | * '''Id''' — a unique identifier for an element in the document (<code>id</code> attribute). | ||
| + | * '''Language Direction''' — the direction of the text: left to right (LTR) or right to left (RTL) (<code>dir</code> attribute). | ||
| + | * '''Access key''' — a keyboard shortcut to access an element (<code>accesskey</code> attribute). | ||
| + | * '''Name''' — the name of the anchor element (<code>name</code> attribute). | ||
| + | * '''Language Code''' — the language of the element specified according to [http://www.ietf.org/rfc/rfc1766.txt RFC 1766] (<code>lang</code> attribute). | ||
| + | * '''Tab Index''' — the tab order of the element (<code>tabindex</code> attribute). | ||
| + | * '''Advisory Title''' — the text of the tooltip that is shown when the mouse cursor hovers over the link (<code>title</code> attribute). | ||
| + | * '''Advisory Content Type''' — the content type of the link (<code>type</code> attribute). | ||
| + | * '''Stylesheet Classes''' — a class of the element (<code>class</code> attribute). Note that an element might be assigned more than one class. If this is a case, separate class names with spaces. | ||
| + | * '''Linked Resource Charset''' — the character set of the linked resource (<code>charset</code> attribute). | ||
| + | * '''Style''' — CSS style definitions (<code>style</code> attribute). Note that each value must end with a semi-colon and individual properties should be separated with spaces. | ||
| + | |||
Revision as of 13:16, 28 October 2010
Contents
Links and E-mails
The Link feature of CKEditor is a powerful option that lets you add clickable hyperlinks or e-mail addresses to your documents as well as control the way they look and work.
To insert a link to you document, press the ![]() button on the toolbar. The Link dialog window that will open lets you choose the link type and various configuration options pertaining to your choice.
button on the toolbar. The Link dialog window that will open lets you choose the link type and various configuration options pertaining to your choice.
The Link dialog window includes two or four tabs that group link options, depending on a link type:
- Link Info
- Target (this tab is only available for the URL link type)
- Upload (this tab is only available for the URL link type)
- Advanced
All tabs contain the ![]() and
and ![]() buttons that let you accept the changes or close the dialog window without performing any changes, respectively.
buttons that let you accept the changes or close the dialog window without performing any changes, respectively.
Once inserted into the document, the link can be edited at any time by double-clicking it. The Link dialog window will open again and you will be able to introduce changes to the link configuration options.
If you attempt to close the Link dialog window without saving the changes, you will be prompted to do so:
You can either proceed without saving your changes by choosing OK or close the alert window with the Cancel command and save the changes.
Link Type: URL
URL is the default link type that lets you add a website address to your document. For this sort of link all four tabs of the Link dialog window are available.
Link Info
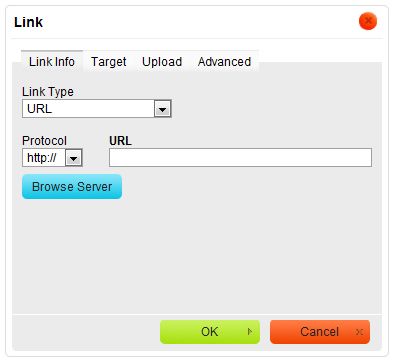
The Link Info tab is the default tab that opens after you press the ![]() button on the toolbar. It allows you to choose the link type as well as set the link protocol and URL.
button on the toolbar. It allows you to choose the link type as well as set the link protocol and URL.
Below is an overview of all Link Info tab elements:
- Link Type — the category of the link that will be inserted into the document. You can choose between the following options:
- URL — the plain web address of any resource available in the Internet: a website, a PDF document, or an image.
- Link to anchor in the text — an internal link pointing the reader to a designated point in your document.
- Example:
- #anchor1
- E-mail — the e-mail address.
- Example:
- myname@example.com
- Protocol — the communication protocol used with the web address. You can choose between the following options: http://, https://, ftp://, news://, or <other>.
- URL — the web address of the resource that the link is pointing to. It may be located on the same server as the web site you are currently in or on an external server.
- External server: If you want to use an external address, use the full absolute path.
- Local server: If the resource is located on the same server, you can use an absolute path that omits the domain name and starts with a slash.
- Example:
- /about/mission.html
- /howto/printing.avi
- If CKEditor is integrated with a file browser (like CKFinder), you can also use the Browse Server button to select a resource from the ones that are available on the server.
Target
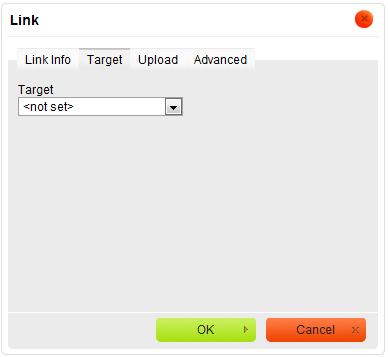
The Target tab is only available for the URL link type. It specifies the location where the link will open after you click it. By default the target of the URL is not set and the link will open in the same browser window or tab as the document.
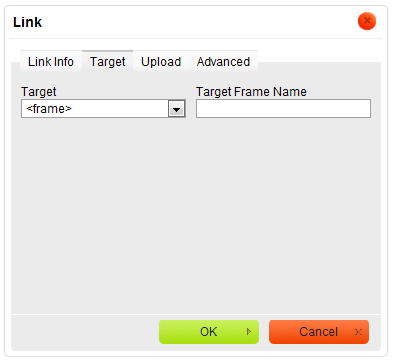
This tab contains only one element: a drop-down Target list that lets you choose the location where the link will open. The list contains the following options:
- <not set> — the default setting that opens the link in the same browser window or tab as the document.
- <frame> — the setting that opens the link in the frame specified in the Target Frame Name text box. The text box is only visible after you choose <frame> as the target.
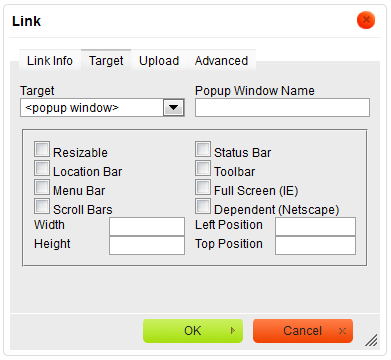
- <popup window> — the setting that opens the link in the pop-up window specified in the Popup Window Name text box. The text box is only visible after you choose <popup window> as the target.
- If you choose to open the link in a pop-up window, you may configure some further options that control the appearance of the pop-up. Note, however, that the users' browser settings might override these options and make the pop-up window appear in a standard new browser tab or window instead. The following options are available:
- Resizable — this parameter controls whether the pop-up window may be resized.
- Status bar — this parameter controls whether the pop-up window will contain the status bar.
- Location bar — this parameter controls whether the pop-up window will contain the location bar.
- Toolbar — this parameter controls whether the pop-up window will contain the toolbar.
- Menu bar — this parameter controls whether the pop-up window will contain the menu bar.
- Full screen — this parameter controls whether the pop-up window will be maximized (full-screen).
- Scroll bars — this parameter controls whether the pop-up window will contain the scroll bars.
- Dependent — this parameter controls whether the pop-up window will close when the window that opens it closes (works in Netscape only).
- Width — the width of the pop-up window.
- Height — the height of the pop-up window.
- Left Position — the offset of the pop-up window from the left side of the screen.
- Top Position — the offset of the pop-up window from the top of the screen.
- New Window (
_blank) — the setting that opens the link in a new window. - Topmost Window (
_top) — the setting that opens the link in a window that is positioned on the top. - Same Window (
_self) — the setting that opens the link in the same window as the document. - Parent Window (
_parent) — the setting that opens the link in the window that the document window is nested in.
Upload
The Upload tab is only available for the URL link type.
The Upload tab of the Link dialog window allows you to send your own resources to the server. It is only visible if the server accepts files uploaded by the users and CKEditor is integrated with a file browser (like CKFinder).
To upload a file, click the file input field or the Browse button next to it. When the file browser of your operating system opens, navigate to an appropriate folder and choose a file by double clicking it or using the Open button. To send the file to the server, click the Send it to the Server button of CKEditor. The Link Info tab will open and the URL of the uploaded file will automatically appear in the URL field.
Advanced
The Advanced tab lets you configure additional link options such as assign it an ID, a class, a tab index, a tooltip, or CSS style properties. It is meant for advanced users with knowledge of HTML and CSS and gives nearly endless possibilities as far as the presentation of the link is concerned.
Below is the overview of all Advanced tab elements:
- Id — a unique identifier for an element in the document (
idattribute). - Language Direction — the direction of the text: left to right (LTR) or right to left (RTL) (
dirattribute). - Access key — a keyboard shortcut to access an element (
accesskeyattribute). - Name — the name of the anchor element (
nameattribute). - Language Code — the language of the element specified according to RFC 1766 (
langattribute). - Tab Index — the tab order of the element (
tabindexattribute). - Advisory Title — the text of the tooltip that is shown when the mouse cursor hovers over the link (
titleattribute). - Advisory Content Type — the content type of the link (
typeattribute). - Stylesheet Classes — a class of the element (
classattribute). Note that an element might be assigned more than one class. If this is a case, separate class names with spaces. - Linked Resource Charset — the character set of the linked resource (
charsetattribute). - Style — CSS style definitions (
styleattribute). Note that each value must end with a semi-colon and individual properties should be separated with spaces.
Link to anchor in the text
If user chooses "Link to anchor in the text" then new options will be displayed in the Link Info bookmark.
User may select the link to the anchor in two ways.
- By Anchor Name: After creating a new anchor, user can select the anchor by name.
- By Element Id: Selects the anchor by Id.
Pressing "OK" inserts the link in user's document.
E-mail
If user sets "E-mail" new options will appear in the Link Info bookmark:
- E-mail Address: specifies the e-mail address which link refers to.
- Message Subject: specifies the subject of the message which is send to the e-mail address.
- Message Body: specifies the text of the message which is send to the e-mail address.
Press "OK" to insert the link in your document.
Advanced options
No matter which Link Type user chooses, bookmark called "Advanced" remains unchangeable:
File:CKEditor link advanced.png
- Id: specifies link's ID.
- Language Direction: sets the language direction from left to right ( LTR ) or from right to left ( RTL ).
- Access Key: sets up an access key to the link.
- Name: specifies link's name.
- Language Code: defines the code of the language e.g. en, pt, pt
- Tab Index: defines the tab index.
- Advisory Title: specifies the description of the target object.
- Advisory Content Type: specifies the MIME type of the target object.
- Stylesheet Classes: specifies the name of the CSS class.
- Linked Resource Charset: specifies the charset of the target object.
- Style: defines the style
Press "OK" to insert the link.
Anchors
In order to insert an anchor in the text place the cursor before the text or section you want to the anchor to refer and press File:CKEditor anchors.png button on the toolbar. A popup window called "Anchor Properties" appears:
- Anchor Name: specifies the anchor name. User refers to this name while linking to the anchor.
The anchor appears in the document after pressing "OK” button.

